Dear Students,
Budapest Business School enables students to have access to dormitory’s IT network beside the WIFI network.The following description provides help with software setup.
Dear Students,
Budapest Business School enables students to have access to dormitory’s IT network beside the WIFI network.The following description provides help with software setup.
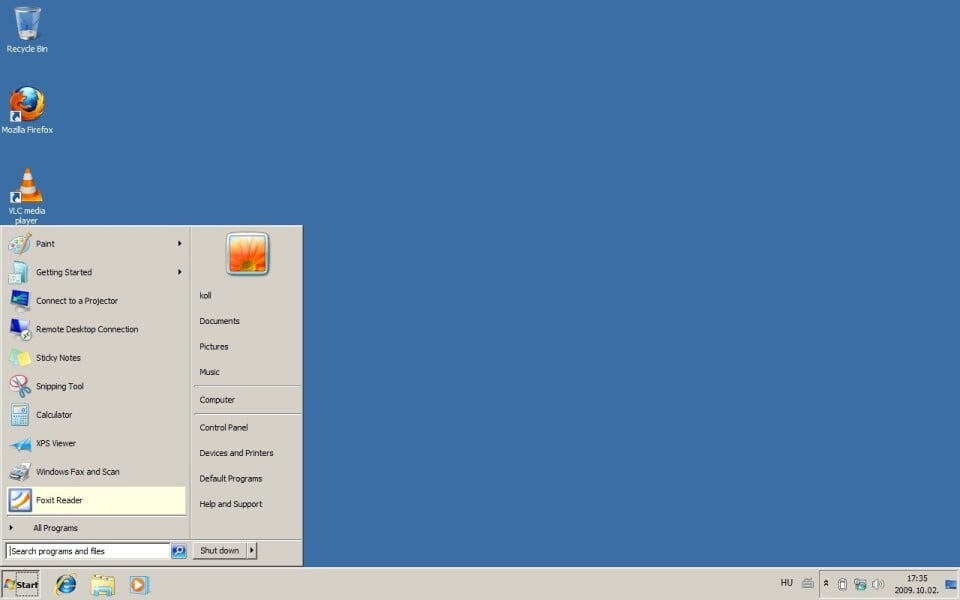
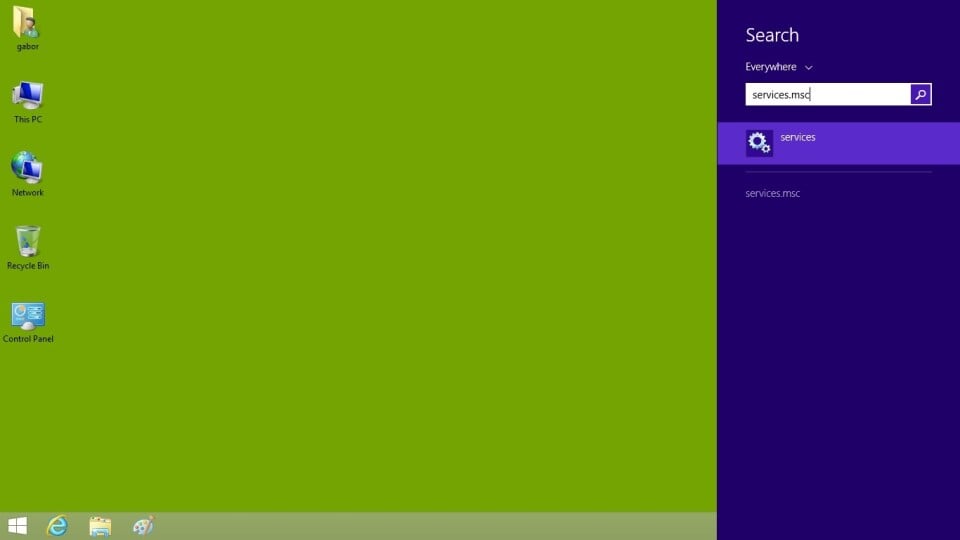
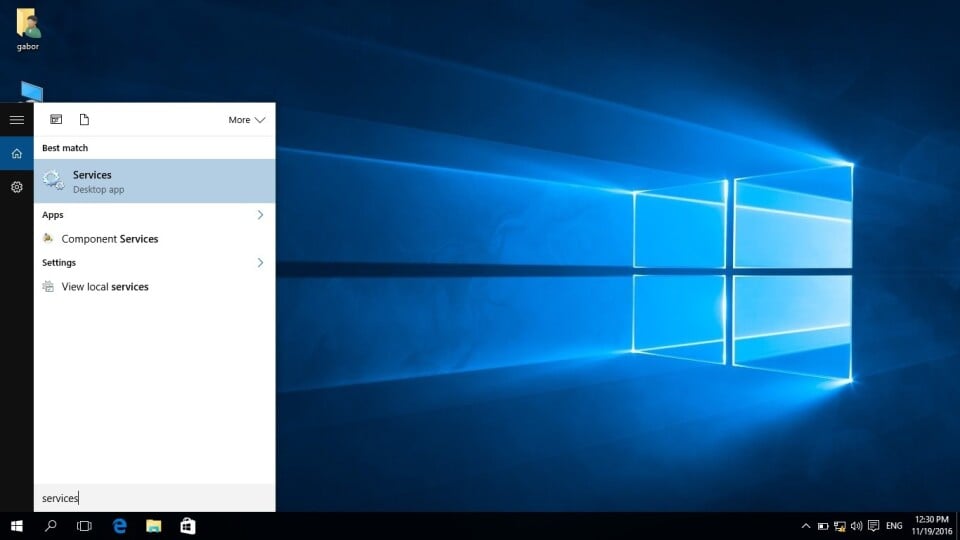
1. Click on the Start menu/ Search programs and files and enter the following: services.msc then please press Enter.
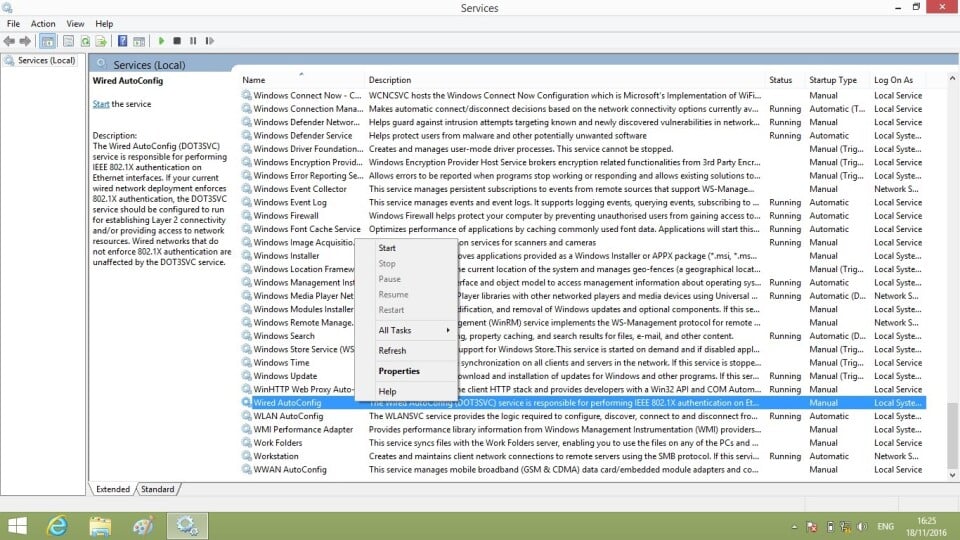
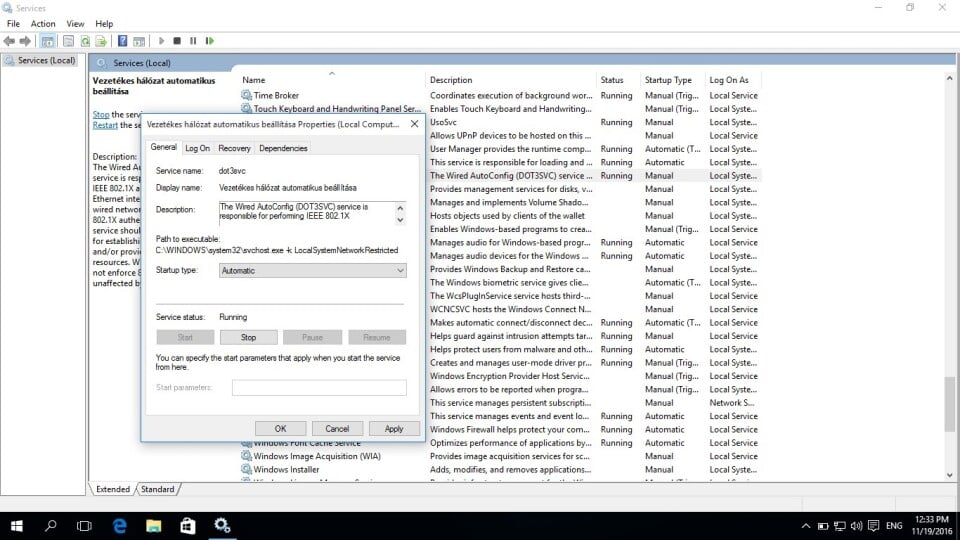
2. Please select the Wired Auto Config line in the newly opened Services window then click right and select Properties button.
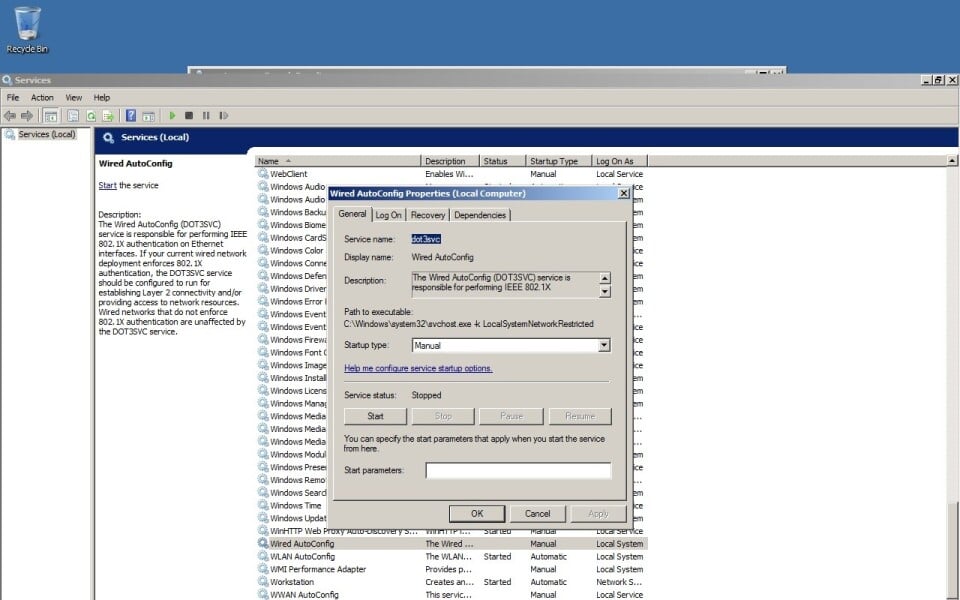
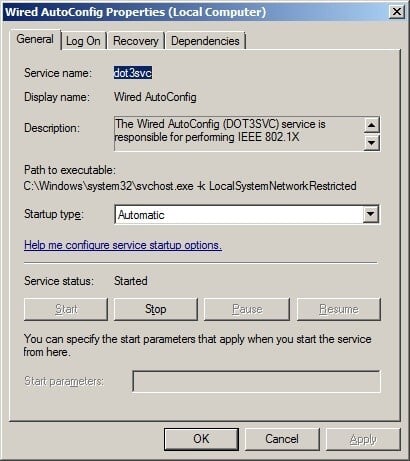
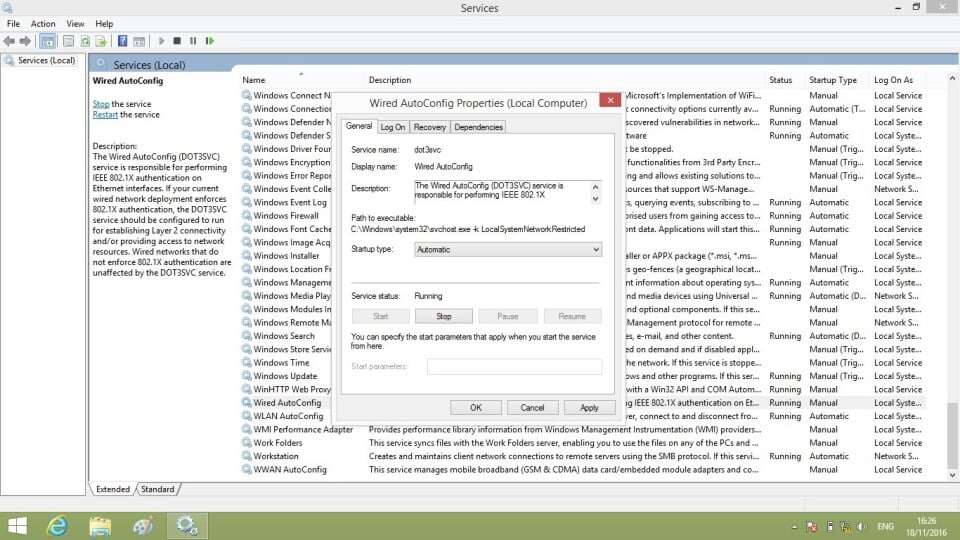
3. In the pop-up window please select Automatic instead of Startup type from the drop-down list and then click on the Start button.
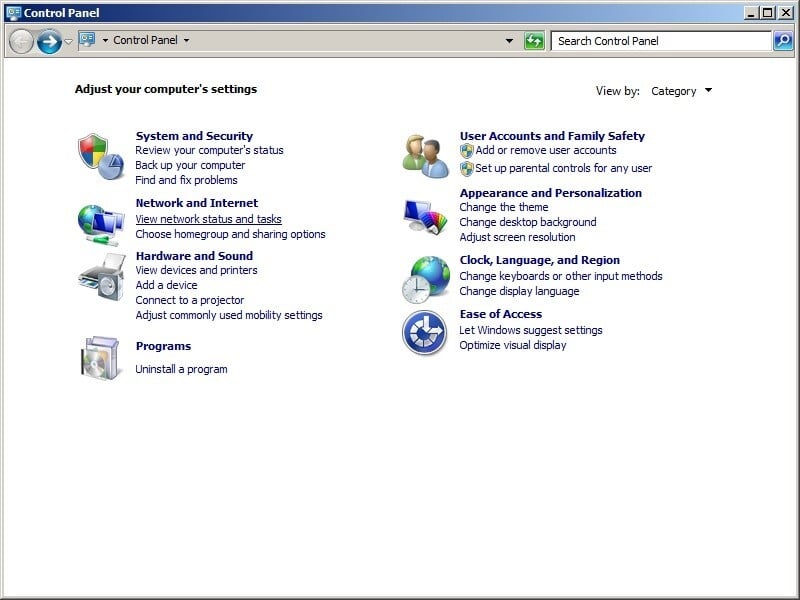
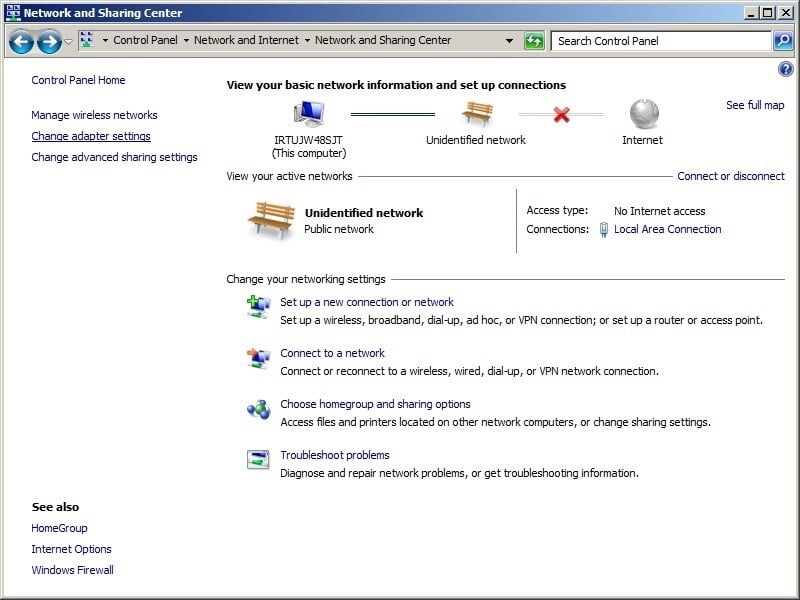
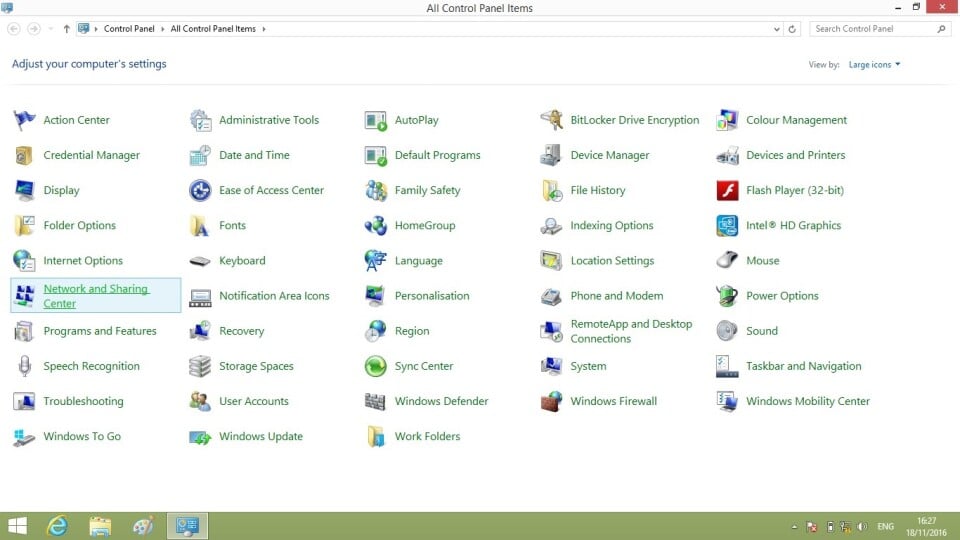
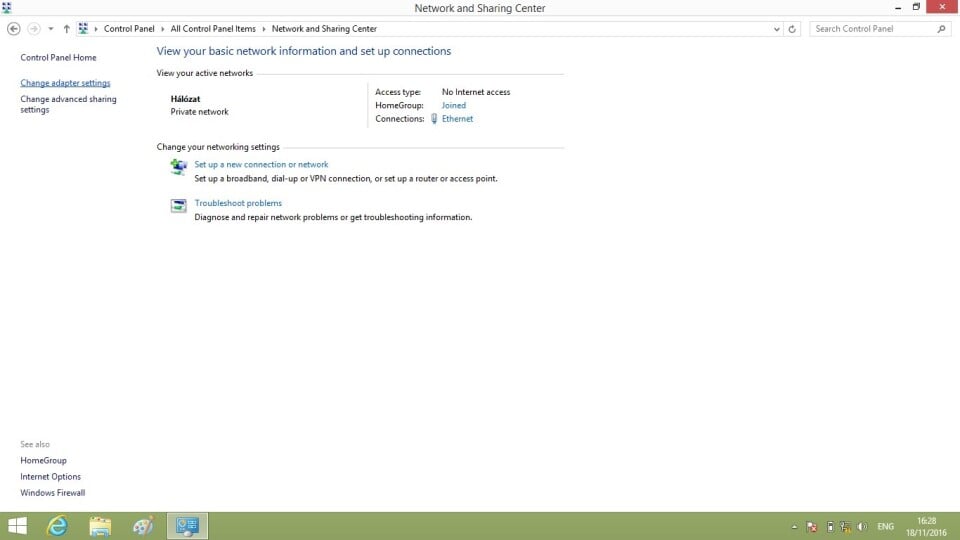
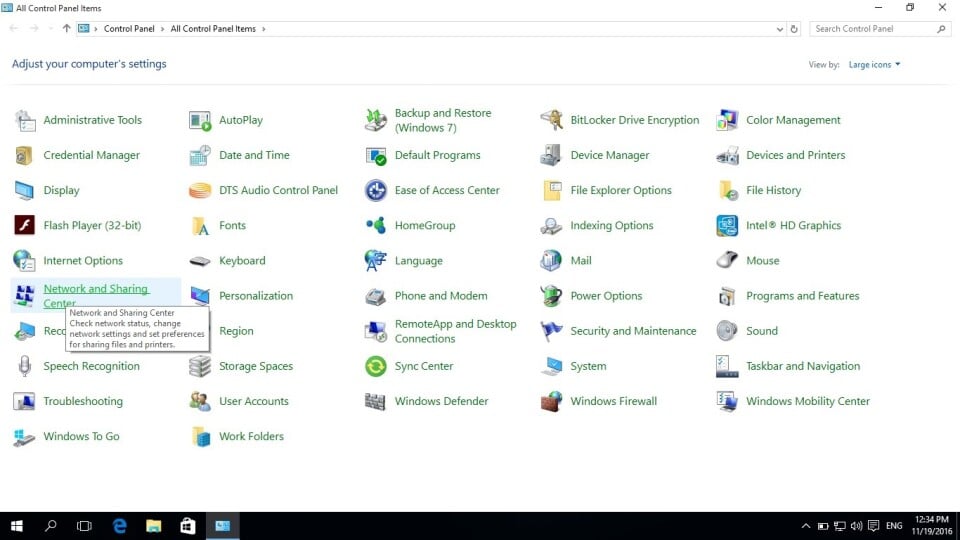
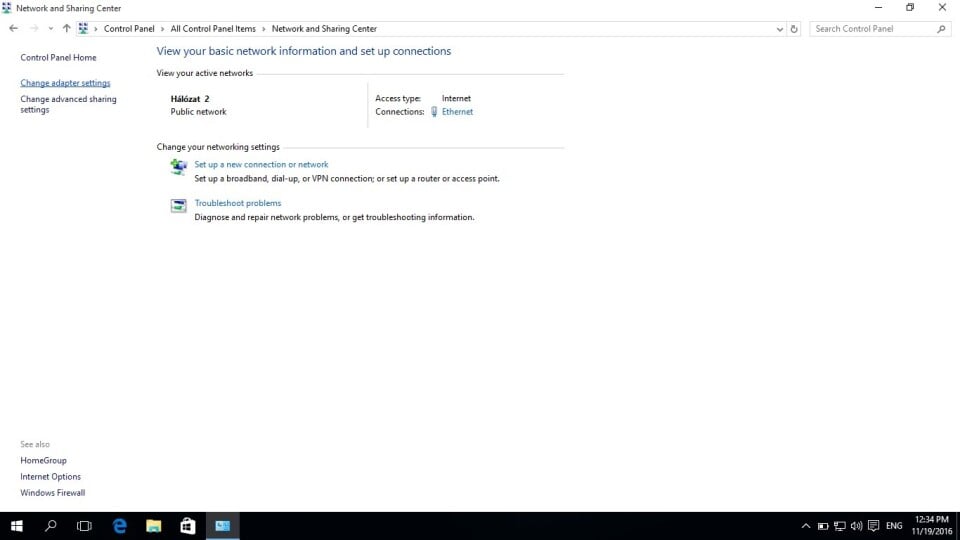
4. After clicking the OK button, please close the opened windows, then by clicking on Start menu/ Control Panel/ Network and Internet/ View network status and tasks open Network and Sharing Center.
5. Please click on the Change adapter settings which is on the left side of the opened Network and Sharing Center window.
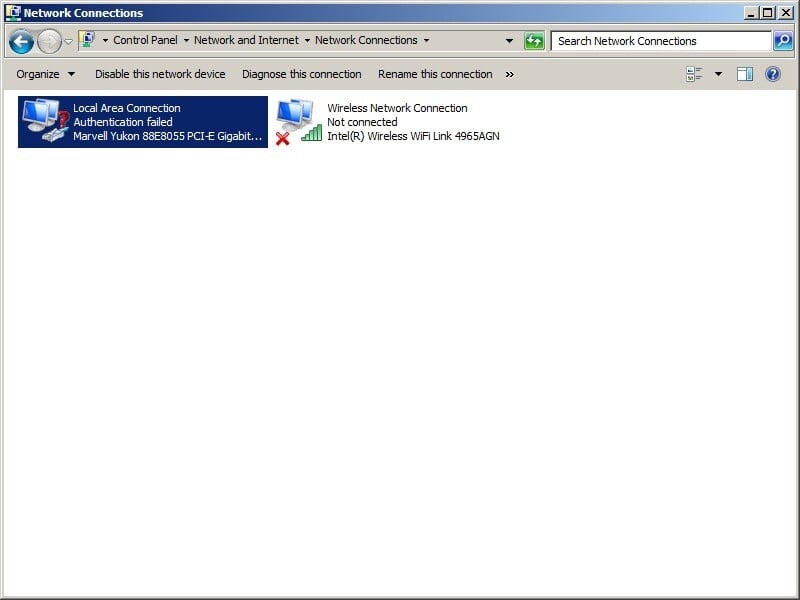
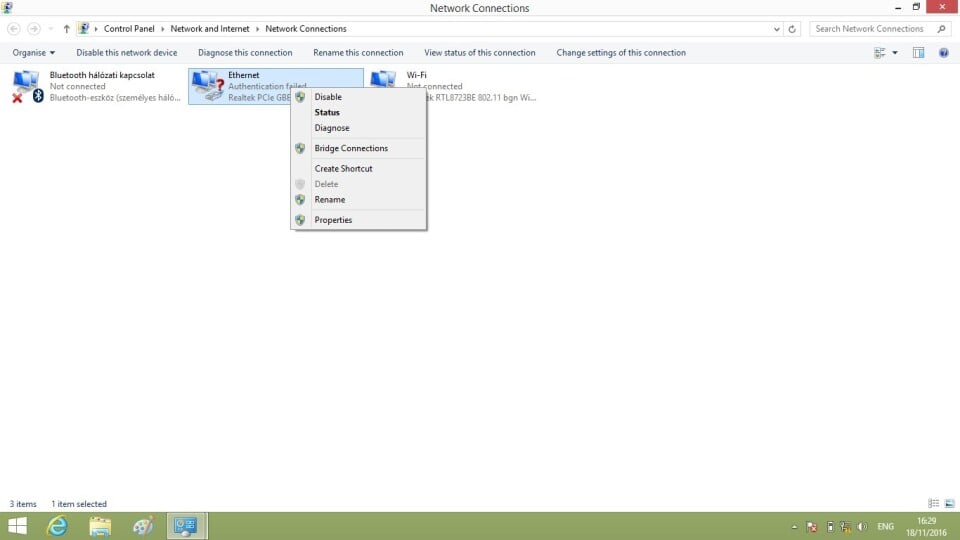
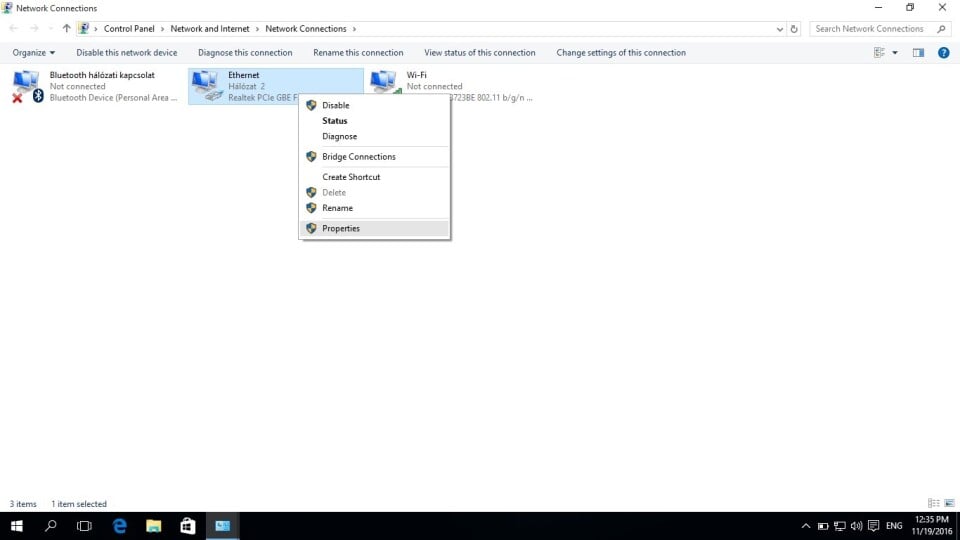
6. In the Network connections window please click right on the Local Area Connection icon and select Properties from the menu.
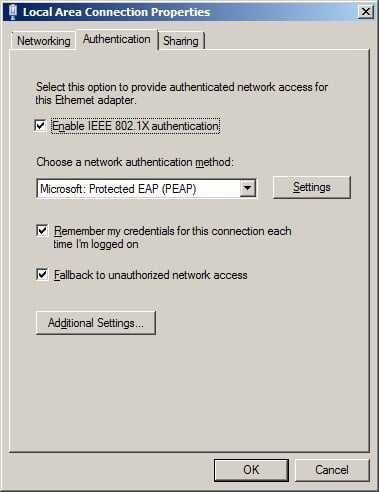
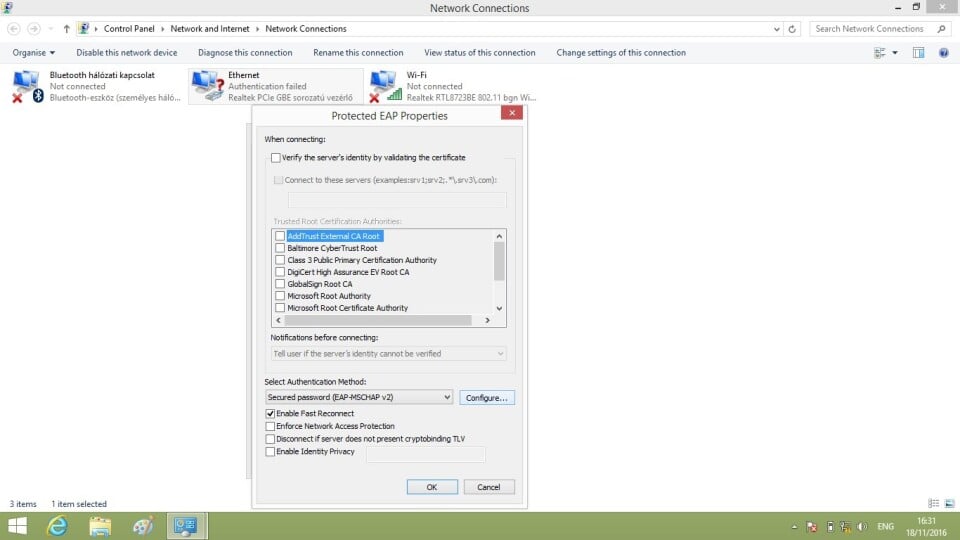
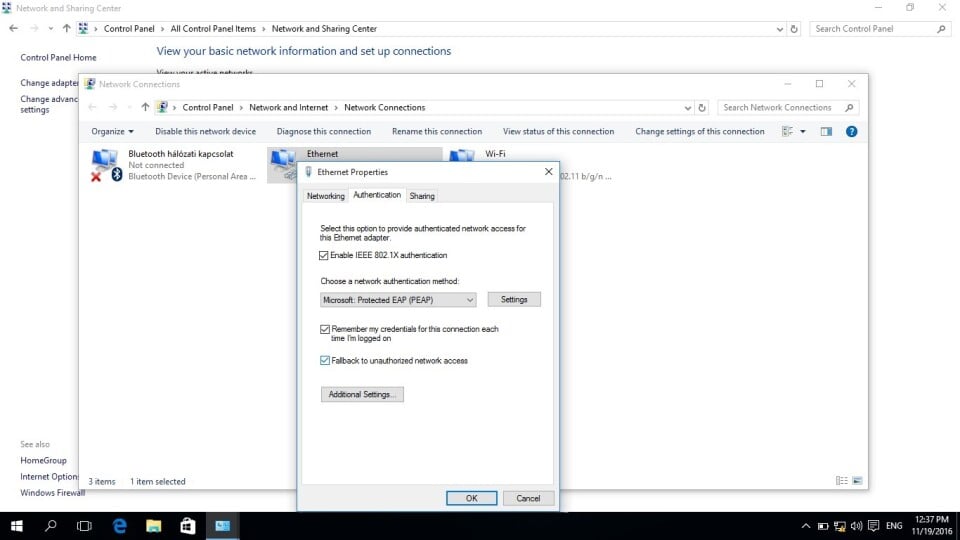
7. Please select the Authentication label (if it is missing then the Wired AutoConfig service has not been launched). Please tick IEEE 802.1X authentication, then select Microsoft Protected EAP (PEAP) from the drop-down list of the Network authentication method and finally click on the Settings button next to the Protected EAP (PEAP) line.

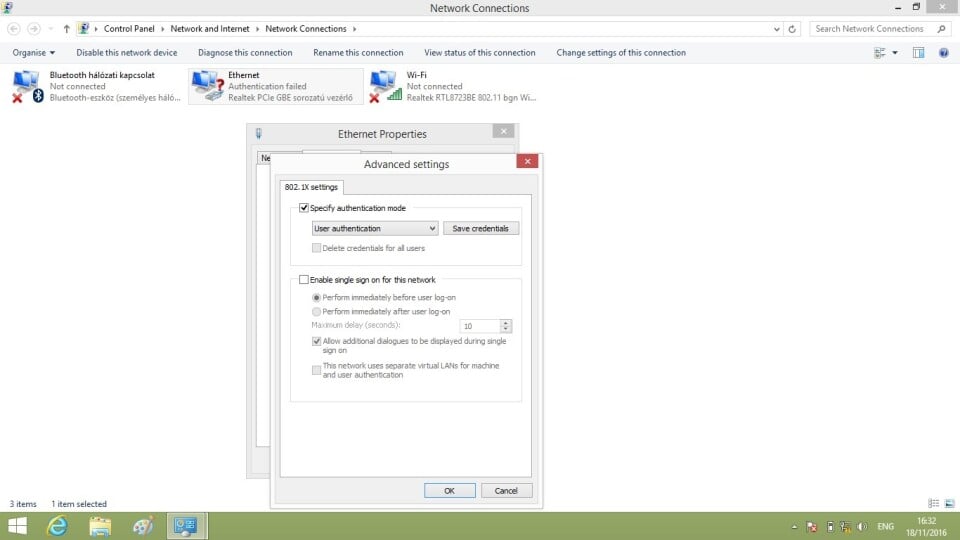
8. Please select the Additional Settings… button. Tick IEEE 802.1X authentication, then select Microsoft Protected EAP (PEAP) from the drop-down list of the Network authentication method and finally click on the Settings button next to the Protected EAP (PEAP) line.
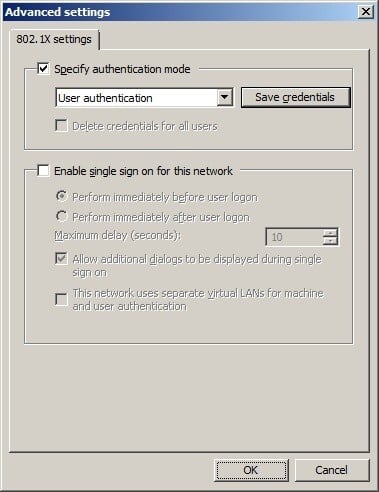
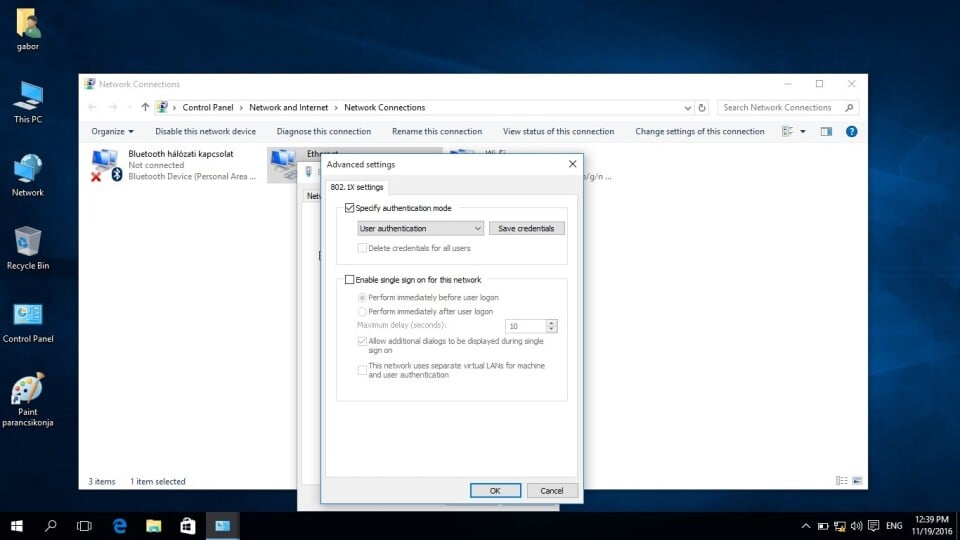
9. Please select Specify authentication mode in the newly opened window, then select User authentication from the drop-down list and finally click on the OK button!
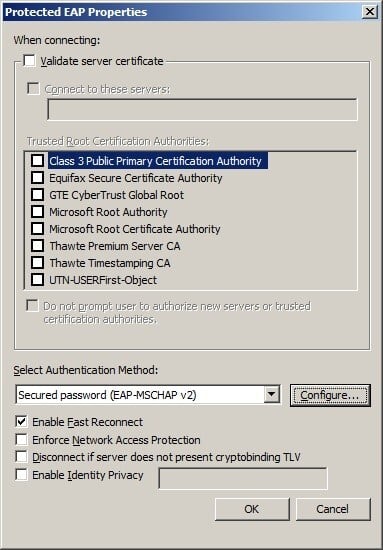
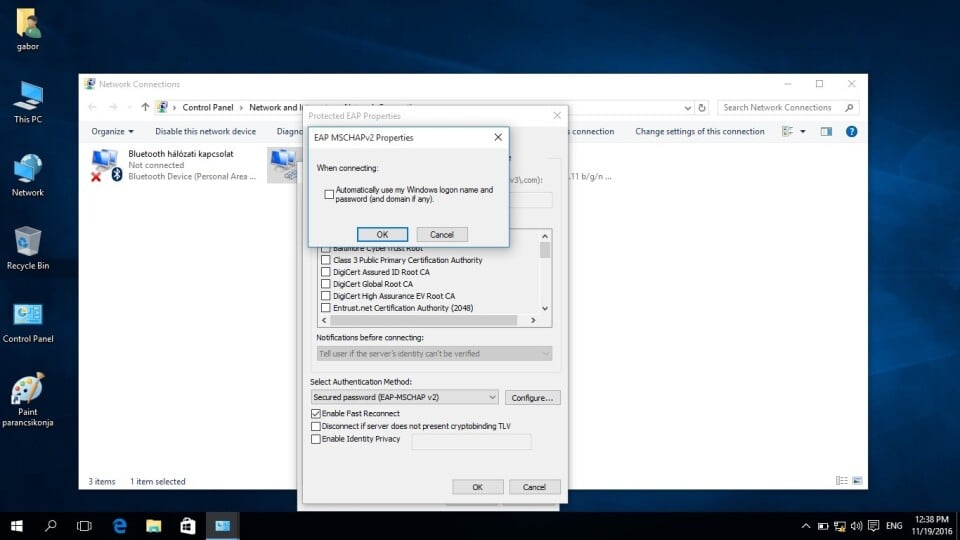
10. Please untick Validate server certificate, then select Secured password (EAP-MSCHAP v2) from the Select Authentication Method menu and finally click on the Configure button.
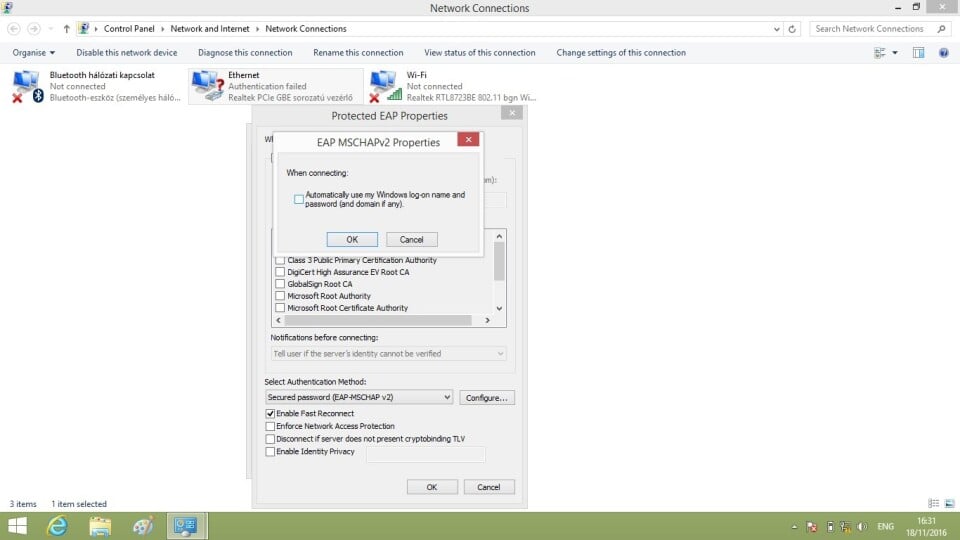
11. Please untick Automatically use my Windows logon name and password (and domain if any) in the newly opened window.

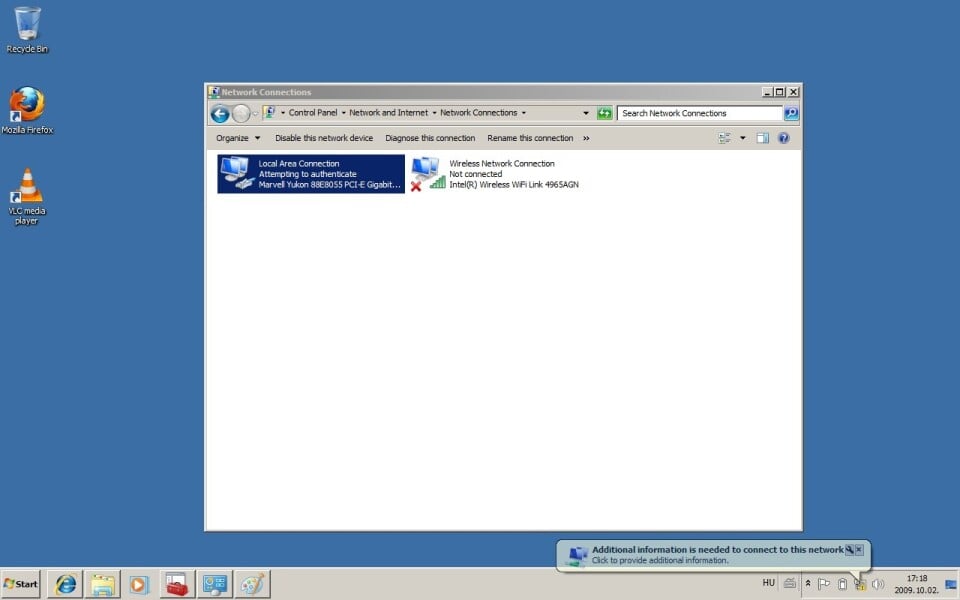
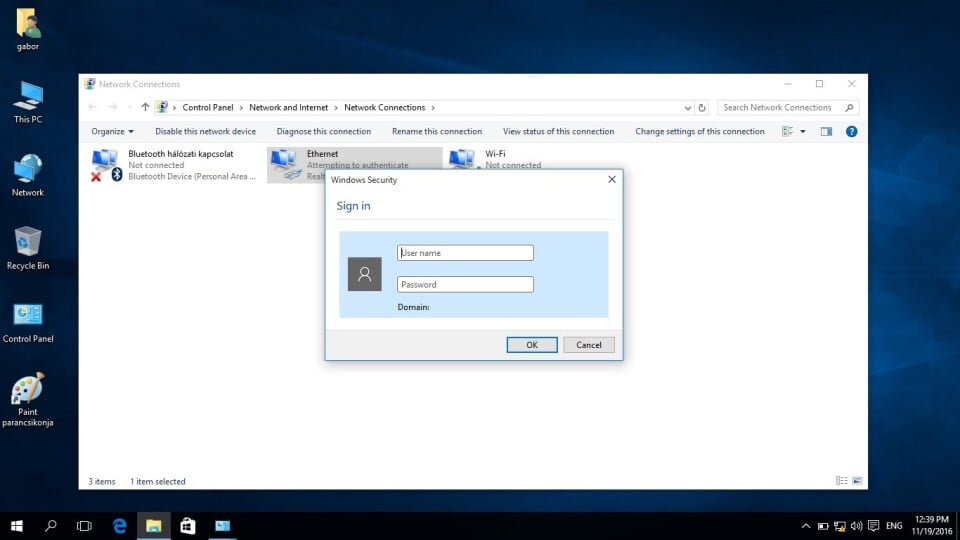
12. Close all the opened windows by clicking OK. After this step, the Additional information is needed to connect to this network cloud appears and you have to click on it
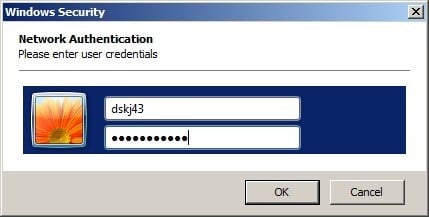
13. Fill out the login data fields with your own login details:
Press OK button.
If you gave the correct password, then after clicking the OK button, the internet will be available for you withing 30 seconds. If the authentication was not successful, then untick Enable IEEE 802.1X authentication and start the procedure from point 7 again.
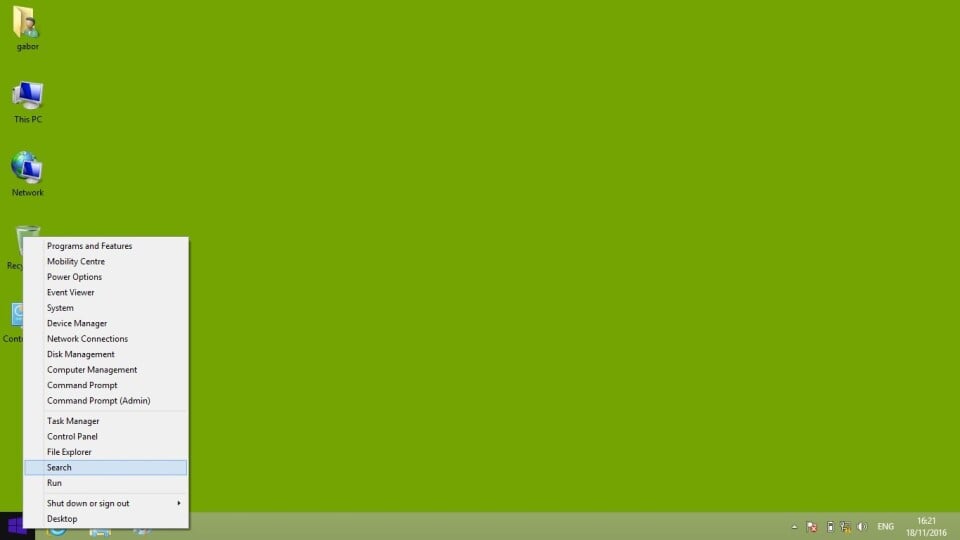
1. Click right and then choose Search from the menu.
2. Please add services.msc in the search box of the opened Search window. After Services appears, choose and click on it.
3. Please choose Wired AutoConfig line in the newly opened Services window and open Properties by clicking right.
4. In the pop-up window please select Automatic instead of Startup type from the drop-down list and then click on the Start button, which is under the Service status label. After clicking the OK button, please close the opened windows.
5. Start menu / Control Panel/ Network and Sharing Center
6. Please click on the Change adapter settings which is on the left side of the opened Network and Sharing Center
7. In the Network connections window please click right on the Ethernet icon and select Properties from the menu.
8. Please select the Authentication label (if it is missing then the Wired AutoConfig service has not been launched). Please tick Enable IEEE 802.1X authentication connection, then select Microsoft Protected EAP (PEAP) from the drop-down list of the Network authentication method and finally click on the Settings button next to the Protected EAP (PEAP) line.

9. Please untick Verify the server’s identity by validating the certificate, then select Secured password (EAP-MSCHAP v2) from the Select Authentication Method menu and finally click on the Configure button.
10. Please untick Automatically use my Windows logon name and password (and domain if any) in the newly opened window.
11. After clicking the Additional Settings (Point 8) please select Specify authentication mode in the newly opened window, then select User authentication from the drop-down list and finally click on the OK button.
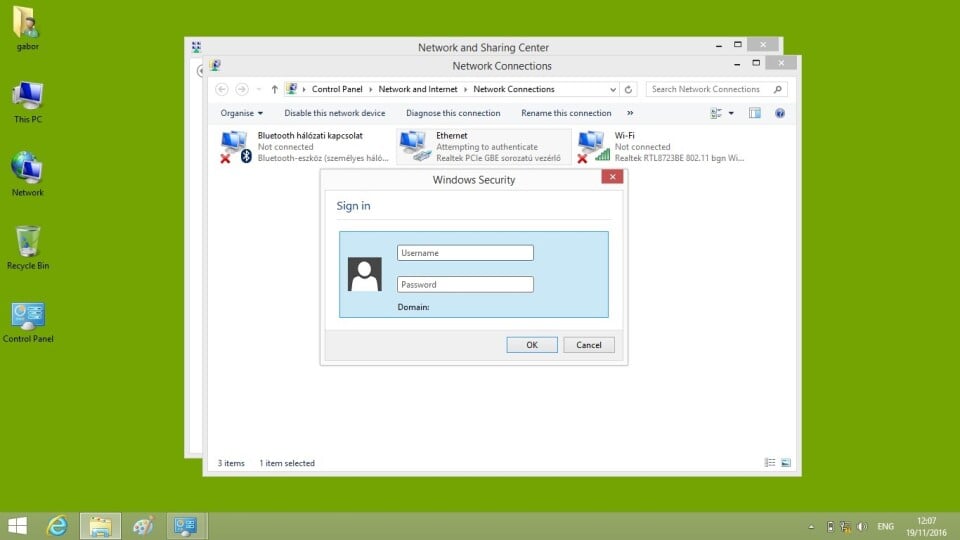
12. Close all the opened windows by clicking OK. After this step, the under Ethernet sign will appear the attempt for the authentication in the bottom right corner, then a Sign In window will pop-up.
Fill out the login data fields with your own login details:
Press OK button.
If you gave the correct password, then after clicking the OK button, the internet will be available for you withing 30 seconds. If the authentication was not successful, then untick Enable IEEE 802.1X authentication and start the procedure from point 8 again.
1. Click on the Search icon and enter the following: services.msc then please press Enter
2. Please select the Wired Auto Config line in the newly opened Services window then click right and select Properties button. In the pop-up window please select Automatic instead of Startup type from the drop-down list and then click on the Start button, which is under the Service status label. After clicking the OK button, please close the opened windows.
3. Start menu (right click)/ Control Panel/ Network and Sharing Center
4. Please click on the Change adapter settings which is on the left side of the opened Network and Sharing Center
5. In the Network connections window please click right on the Ethernet icon and select Properties from the menu.
6. Please select the Authentication label (if it is missing then the Wired AutoConfig service has not been launched). Please tick Enable IEEE 802.1X authentication connection, then select Microsoft Protected EAP (PEAP) from the drop-down list of the Network authentication method and finally click on the Settings button next to the Protected EAP (PEAP) line.
7. Please untick Verify the server’s identity by validating the certificate, then select Secured password (EAP-MSCHAP v2) from the Select Authentication Method menu and finally click on the Configure button.

8. Please untick Automatically use my Windows logon name and password (and domain if any) in the newly opened window.
9. After clicking the Additional Settings (Point 7) please select Specify authentication mode in the newly opened window, then select User authentication from the drop-down list and finally click on the OK button.
10. Close all the opened windows by clicking OK. After this step, the under Ethernet sign will appear the attempt for the authentication in the bottom right corner, then a Sign In window will pop-up.
Fill out the login data fields with your own login details:
Press OK button.
If you gave the correct password, then after clicking the OK button, the internet will be available for you withing 30 seconds. If the authentication was not successful, then untick Enable IEEE 802.1X authentication and start the procedure from point 7 again.
If you have any problems setting up or using the services, don't worry! Feel free to write to your faculty's IT team. Be sure to include the following in your message:
✅ Your Neptun code
✅ Details of the error
✅ If you can, attach screenshots
This way they can help you faster! 😊
📧 Contacts:
· FFA/PSZK IT Support: informatika.pszk@uni-bge.hu
· FIMB/KKK IT Support: informatika.kkk@uni-bge.hu
· FCHT/KVIK IT Support: informatika.kvik@uni-bge.hu